
Setting
File Mode With The GUI
Now
that we have seen how the permissions on files and directories are
set in the last article"system security", we can better
understand
the permission dialogs in the GUI. In both Nautilus (GNOME) and
Konqueror
(KDE),
right-clicking a file or directory icon will expose a properties
dialog.suppose that an file whose permission wee change throgh the
terminal commands..now it's time to show you how it will done by the
GUI mode..
1.
right click in file and goto proporties and in their are an otion
named 'permission' where you can change seperately its ownerships
permissions..i put an screenshot of my screen for understanding...

where
you will get all the three owners section seperatly and by scrolling
you can easily do it.
that
it for permission changing through the commands and by GUI mode now
come to the next point that an command 'umask' which use to change
the mask value of the newly created file and directories.
what
is mean of mask here..?
umask
– Set Default Permissions
actually
mask means the default initilise values of the permission..or in
simle word it an default permission given to the file while it creat.
The
umask command controls the default permissions given to a file when
it is created.
It
uses octal notation to express a mask of bits to be removed from a
file's mode attributes.
Let's
take a look:
steps
:
1.
creat an new file ,like here i creat it with name zerocool.txt.
command:
ubuntu@ubuntu:~$
>zerocool.txt
by
using the redirectional (>) sign/operator
2.
now check out its detail by using 'ls' commands along with '-l' as
its attributes.
command:
ubuntu@ubuntu:~$
ls -l zerocool
-rw-rw-r--
1 ubuntu ubuntu 0 Dec 25 10:15 zerocool
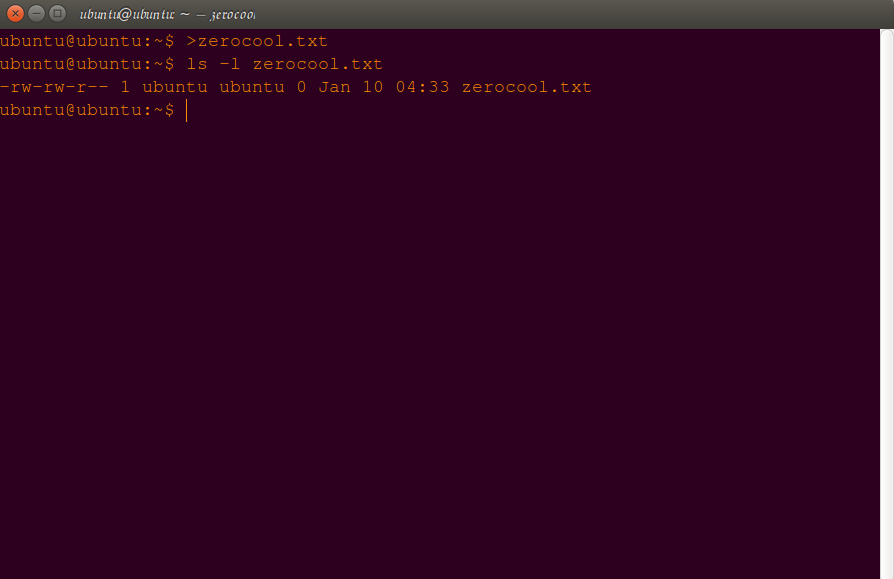
analysis:
now
here you can see that the created file is an ordinary fily by seeing
the rmission first charecter(-).
and
its owner and groups have only read and write permission,no execution
permission
but
'everyone/world' owner have only and only read permission ,means the
world or other users have no permission to write or delete or rename
the file.
these
all are the default values.
3.
now just delete this file and use unmask command to change the
default permission values.
by
giving an octal number as permission.
command:
ubuntu@ubuntu:~$
umask
0002
ubuntu@ubuntu:~$
rm -f zerocool.txt
ubuntu@ubuntu:~$
umask 0022
ubuntu@ubuntu:~$
umask
0022
ubuntu@ubuntu:~$

4.now
creat an new fresh file zerocool..and check its detail by 'ls'
command.
command:
ubuntu@ubuntu:~$
>zerocool
ubuntu@ubuntu:~$
ls -l zerocool
-rw-r--r--
1 ubuntu ubuntu 0 Dec 25 10:22 zerocool

now
you see that the default permission is changed here than previous one
..so lets have an close look why and how this happen.
umask
is the first answer ,that's why this effect occur .
now
how it be done...actually the argument(0022) given to the commands
'umask' is also an octal number.
NOTE:
but
here you see that 4 digits but in previous command 'chmod' we use
only three digit whats its mean..?
actually
here 4 digit means last 3 for owners and first digit for the file
type.
means
in 0022 argument.
file
type-(0)
file
mode -(022)
now
lets understand it with examples(0022).
Original
file mode --- rw- rw- r--
octal
0 0 2 2
Mask
000 000 010 010
Result
--- rw- r-- r--
now
from the example you have to see only the '1' binary number what you
just conclude.
you
see in 'group' owner that it befors have both permission but after it
have no permission to write in the file.
so
the main conclusion is that when an binary '1' appear it just unset
that confriguation.
lets
see another example..(0000)
Original
file mode --- rw- rw- r--
octal
0 0 0 0
Mask
000 000 000 000
Result
--- rw- rw- r--
here
you see that no '1' appear here so the orignal value remain same as
before.
commands:
ubuntu@ubuntu:~$
umask 0000
ubuntu@ubuntu:~$
>zerocool;ls -l zerocool
-rw-rw-rw-
1 ubuntu ubuntu 0 Dec 25 10:50 zerocool
ubuntu@ubuntu:~$
rm zerocool;umask 0022;>zerocool;ls -l zerocool
-rw-r--r--
1 ubuntu ubuntu 0 Dec 25 10:51 zerocool
ubuntu@ubuntu:~$

i
hope from these examples and the screenshot you will get an pretty
much good idea what it do..and how it do..
so..Playvwith
some values (try some sevens) to get used to how this works. When
you're done, remember to clean up:
i
mean just reset the value by command after all you have done your
experiments.
commands:
ubuntu@ubuntu:~$
rm zerocool;umask 0002
ubuntu@ubuntu:~$
umask
0002
ubuntu@ubuntu:~$

Most
of the time you won't have to change the mask; the default provided
by your distribution
will
be fine. In some high-security situations, however, you will want to
control it.
Some
Special Permissions
Some
Special Permissions
Though
we usually see an octal permission mask expressed as a three digit
number,
it
is more technically correct to express it in four digits. Why?
Because, in addition
to
read, write, and execute permission, there are some other, less used,
permission
settings.
The
first of these is the setuid bit (octal 4000). When applied to an
executable file,
it
sets the effective user ID from that of the real user (the user
actually running the
program)
to that of the program's owner. Most often this is given to a few
programs
owned
by the superuser. When an ordinary user runs a program that is
“setuid
root”
, the program runs with the effective privileges of the superuser.
This
allows
the program to access files and directories that an ordinary user
would normally
be
prohibited from accessing. Clearly, because this raises security
concerns,
the
number of setuid programs must be held to an absolute minimum.
The
second less-used setting is the setgid bit (octal 2000) which, like
the setuid
bit,
changes the effective group ID from the real group ID of the real
user to that
of
the file owner. If the setgid bit is set on a directory, newly
created files in the
directory
will be given the group ownership of the directory rather the group
ownership
of
the file's creator. This is useful in a shared directory when members
of a
common
group need access to all the files in the directory, regardless of
the file
owner's
primary group.
The
third is called the sticky bit (octal 1000). This is a holdover from
ancient
Unix,
where it was possible to mark an executable file as “not
swappable.” On
files,
Linux ignores the sticky bit, but if applied to a directory, it
prevents users
from
deleting or renaming files unless the user is either the owner of the
directory,
the
owner of the file, or the superuser. This is often used to control
access to a
shared
directory, such as /tmp.
Here
are some examples of using chmod with symbolic notation to set these
special
permissions.
First
assigning setuid to a program:
chmod
u+s program
Next,
assigning setgid to a directory:
chmod
g+s dir
Finally,
assigning the sticky bit to a directory:
chmod
+t dir
When
viewing the output from ls, you can determine the special
permissions.
Here
are some examples.
First,
a program that is setuid:
-rwsr-xr-x
A
directory that has the setgid attribute:
drwxrwsr-x
A
directory with the sticky bit set:
drwxrwxrwt
so
these are the some important permission which are used at specific
place but now we are not in state to impliments these action ..but
you have too keep in aside we will discuss this topic when it
required or you are in that stage to understood.
ok
for now this is all about 'umask' command.
now
let see another important topic or you can say an concept you all
should know i hope you already inconuter with this comman but now
this time to reveal the little secret.
Changing
Identities
At
various times, we may find it necessary to take on the identity of
another user. Often
we
want to gain superuser privileges to carry out some administrative
task, but it is also
possible
to “become” another regular user for such things as testing an
account. There are
three
ways to take on an alternate identity:
1.
Log out and log back in as the alternate user.
2.
Use the su command.
3.
Use the sudo command.
these
are the possible things to do but for now we only study the 2 and 3
cases.
means
use 'su' and 'sudo' commands.
From
within our own shell session, the su command allows you to assume
the
identity of another user, and either start a new shell session with
that user's IDs,
or
to issue a single command as that user. The sudo command allows an
administrator to
set
up a configuration file called /etc/sudoers, and define specific
commands that
particular
users are permitted to execute under an assumed identity. The choice
of which
command
to use is largely determined by which Linux distribution you use.
Your distribution
probably
includes both commands, but its configuration will favor either one
or
the
other.
here
i am using the linux distro ubuntu...but know problem all the linux
distros are pretty much similar ...
for
now lets start with the 'su' commands.
su
– Run A Shell With Substitute User And Group IDs
command:
ubuntu@ubuntu:~$
whatis su
su
(1) - change user ID or become superuser
The
su command is used to start a shell as another user. The command
syntax looks like
this:
su
[-[l]] [user]
If
the “-l” option is included, the resulting shell session is a
login shell for the specified
user.
This means that the user's environment is loaded and the working
directory is changed to the user's home directory. This is usually
what we want.
If
the user is not specified, the superuser is assumed. Notice that
(strangely) the “-l” may be abbreviated “-”, which is how it
is most often used. To start a shell for the superuser, we would do
this:
zerocool@kali:~$
su -
Password:
root@kali:~#
After
entering the command, we are prompted for the superuser's password.
If it is suc-
cessfully
entered, a new shell prompt appears indicating that this shell has
superuser priv-
ileges
(the trailing “#” rather than a “$”) and the current working
directory is now the
home
directory for the superuser (normally /root.) Once in the new shell,
we can carry
out
commands as the superuser. When finished, enter “exit” to return
to the previous
shell:
root@kali:~#
exit
logout
zerocool@kali:~$
It
is also possible to execute a single command rather than starting a
new interactive com-
mand
by using su this way:
su
-c 'command'
Using
this form, a single command line is passed to the new shell for
execution. It is im-
portant
to enclose the command in quotes, as we do not want expansion to
occur in our
shell,
but rather in the new shell:
zerocool@kali:~$
su -c 'ls -l /root/*'
Password:
-rw-r--r--
1 root root 0 Sep 23 23:32 /root/app.apk
-rw-r--r--
1 root root 32083800 Sep 22 14:47
/root/BIG-WPA-LIST-1.rar
-rw-------
1 root root 352 May 12 2015 /root/btscanner.log
-rw-r--r--
1 root root 32495 Apr 26 2015 /root/config.log
-rw-r--r--
1 root root 3696 Oct 23 16:18 /root/debug_results.txt
-rw-r--r--
1 root root 1805 Oct 25 07:45 /root/dnsrecon.xml
-rw-r--r--
1 root root 16280 Sep 1 12:50 /root/driftnet-0.jpeg
NOTE:
here
is an main point i have to discuss here is why i am not shown the
screen shots of the ubuntu system.their is an point behind this.
actually
by ususing the 'su' command you just give freely permissions to the
malwares too..that is the main drawback of the 'su' commands..and as
i previously said that linux users and the owners have far far
relation ship..mean the permission denied to all the users for
sensitive thing ..it need an priveledge permission from the owner.
that
is why linux security is much better than the window.
that's
why initally ubunntu created then it have only 'sudo' command which
will gives users an super user prievelge.
ok
we discuss a lot in this article we will came again with another
intresting part of sytem security..
please
like and share this article if you like...
and
you can join me at commanding forum in the facebook..
until
this is ....
ZEROCOOL
SIGN
OUT